Why DOT Push-to-Connect Fittings Leak (and How to Fix It)

Table of Contents
Most DOT push-to-connect fitting leaks come from installation or tube condition, not from a defective fitting — usually a tube that wasn't cut cleanly, wasn't pushed fully home, or is under strain at the connection. The good news is that the common causes are identifiable and fixable. This guide covers why these fittings leak, how to find the leak, and how to correct each cause.
First: Why It Matters
On a commercial-vehicle air-brake circuit, a leaking connection isn't cosmetic. Under 49 CFR 393.45(d), brake connections must be free of leaks, and under the CVSA 2026 Out-of-Service Criteria a leak found at a push-to-connect fitting is documented as a violation. So a weeping fitting is worth fixing properly, not just tightening and hoping.
The Common Causes
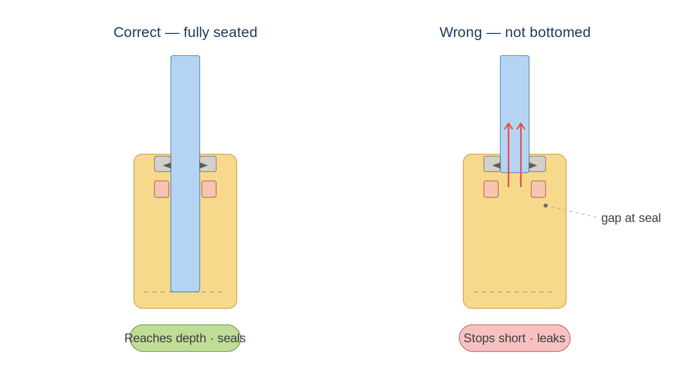
- The tube isn't fully seated. The single most common cause — the tube was pushed until the gripping ring engaged but never reached the bottom, so the seal isn't fully made.
- A poor tube cut. A tube cut with pliers, a knife, or a hacksaw can leave burrs or an oval end. Burrs can damage the seal on insertion; an out-of-round tube can't seal evenly.
- A damaged or worn seal. A seal nicked by a burr, or degraded over time, won't hold.
- Strain at the connection. A tube under pulling (tensile) load, bent tighter than its minimum bending radius, or pressed against the release ring can loosen or unseat.
- Wrong or incompatible tubing. Tubing that isn't the correct SAE J844 (DOT) nylon, or the wrong OD, won't seal reliably.
- An over-tightened threaded body. Over-torquing a brass fitting can damage it and create a leak at the thread.
How to Find the Leak
Bring the system up to pressure and brush a leak-detection solution (soapy water) around each connection. Bubbles show you exactly where air is escaping — at the tube entry, at the seal, or at the threaded end. Pinpointing the location tells you which cause you're dealing with before you start pulling things apart.
How to Fix Each Cause
| Cause | Fix |
|---|---|
| Tube not fully seated | Depressurize, release the tube, and re-insert it fully until it bottoms; confirm with the insertion-depth mark |
| Burred or oval cut | Cut the tube end back square with a proper tube cutter, remove burrs, confirm it's round, and re-seat |
| Damaged seal / body | Replace the fitting |
| Strain at the connection | Re-route so the tube isn't under tension, is within its bending radius, and doesn't touch the release ring |
| Wrong tubing / OD | Replace with correct SAE J844 (DOT) nylon tubing of the right OD |
| Over-tightened thread | Replace the fitting if the body is damaged; reinstall to the manufacturer's torque chart |
Re-Seat or Replace?
Re-seat when the tube simply wasn't fully home or the cut was poor — depressurize, cut the tube end back clean, and push it in fully. Replace when the seal is damaged, the body is cracked or over-torqued, or the fitting has otherwise failed. On a brake circuit, when there's doubt about a seal or a body, replacing the fitting is the conservative call.
Preventing the Next Leak
The prevention is the installation done right: a clean square cut with no burrs and no oval, the tube pushed fully to the bottom, the correct SAE J844 nylon tubing, threaded bodies torqued to the chart, and routing that keeps the tube free of strain and clear of the release ring. Get those right and leaks are rare. The full method is in How to Install DOT Push-to-Connect Fittings Correctly.
Shop DOT Push-to-Connect Fittings →
📚 Related Reading
→ How to Install DOT Push-to-Connect Fittings Correctly
Educational information only. This article is provided by PneumaticPlus for general educational and informational purposes only. It is not legal, engineering, regulatory, or compliance advice, and it creates no advisory relationship. Standards and regulations — including FMVSS, SAE, and FMCSA/CVSA rules — are periodically revised, may be superseded, and vary by jurisdiction and application. Follow the manufacturer's installation instructions for your specific fittings, and confirm all specifications and application requirements with a qualified professional before installation or return to service. PneumaticPlus makes no representation or warranty as to the accuracy, completeness, or currency of this information and disclaims all liability for reliance on it.