How to Install DOT Push-to-Connect Fittings Correctly

Table of Contents
A DOT push-to-connect fitting installs in a few steps: cut the tube square with no burrs and no oval, push it straight into the fitting until it bottoms, and confirm it's fully seated. Most leaks trace to this process rather than the part itself — a tube cut poorly or not pushed all the way home. This guide walks the method for the PneumaticPlus PT series, using the manufacturer's assembly instructions.
Before You Start
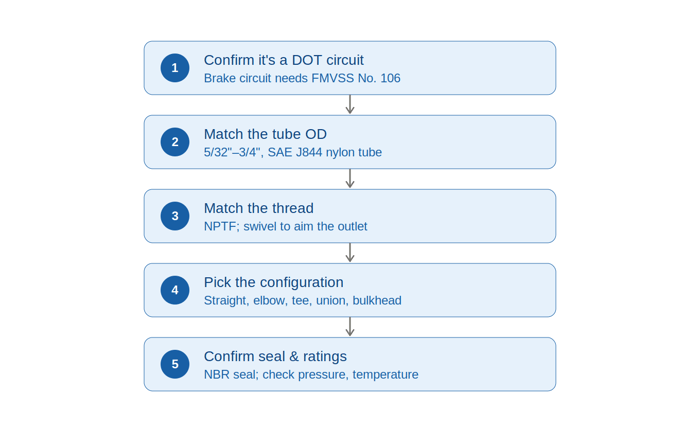
Confirm three things: the tube is the correct size for the fitting (the fitting accepts one OD), the tubing is PA (nylon) complying with SAE (DOT) — SAE J844 tubing, and the port matches the fitting's thread. Have a proper tube cutter on hand; a hacksaw, knife, or pliers will not give a clean cut.
Step 1 — Prepare the Tube
Cut the tube square, at 90°, using a proper tube cutter. Make sure no burrs are left on the inside or outside, and that the tube is not oval after cutting. A burred or out-of-round tube end is one of the most common causes of an immediate leak, because it can damage the seal on insertion or prevent the tube from seating fully. Wipe the tube end clean.
Step 2 — Mark the Insertion Depth
Marking how far the tube needs to go in lets you confirm it's fully seated. The PT line's insertion depths are:
| Tube OD | Insertion depth |
|---|---|
| 5/32" | 13.9 mm (≈0.55") |
| 1/4" | 16.3 mm (≈0.64") |
| 3/8" | 18.3 mm (≈0.72") |
| 1/2" | 19.7 mm (≈0.78") |
| 5/8" | 23.3 mm (≈0.92") |
| 3/4" | 25.1 mm (≈0.99") |
Measure from the tube end and make a mark. When the tube is fully seated, that mark should sit right at the fitting face.
Step 3 — Insert the Tube
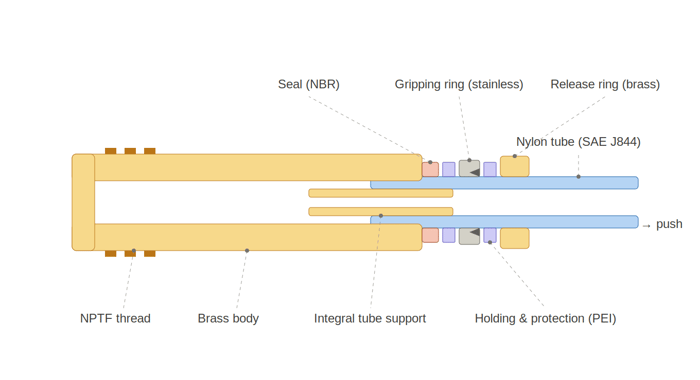
Push the tube straight into the fitting until it bottoms. Inside, the gripping ring lets the tube slide in, the seal closes against the tube's outer diameter, and the incorporated internal tube support reinforces the nylon tube. Push firmly and squarely until it stops — your depth mark should reach the fitting face. As a general check, a gentle tug confirms the gripping ring has engaged.
Step 4 — Threaded Ends
For fittings that thread into a port, the PT line uses NPTF (Dryseal) threads. Tighten to the manufacturer's torque chart — don't guess. Over-tightening a brass fitting can damage the body, and under-tightening can weep, so the torque chart is there for a reason.
Step 5 — Pressure-Test
Bring the system up to pressure and check every connection before returning the vehicle to service. A leak-detection solution (soapy water) brushed around each fitting will show bubbles at any connection that isn't sealed. Under 49 CFR 393.45(d), brake connections must be free of leaks — so this check isn't optional on an air-brake circuit.
Disconnecting a Fitting
As with any pneumatic connection, depressurize the line before disconnecting — a pressurized line can eject the tube. Then press the release ring squarely and pull the tube straight out. After removal, inspect the tube end; if it's marked or damaged, cut it back and re-prepare it before reconnecting.
Keep the Connection Healthy
Two of the manufacturer's cautions prevent problems down the line: keep the tube free of pulling (tensile) load, and respect the tube's minimum bending radius so it isn't strained at the fitting. Also keep objects away from the release ring — pressure against it, even from the side, can release the tube.
Common Installation Mistakes
- Cutting the tube with pliers, a knife, or a hacksaw — leaving burrs or an oval end.
- Not pushing the tube all the way to the bottom, so it isn't fully seated.
- Reusing a tube end that's damaged or marked from a previous connection.
- Forcing the wrong tube OD into a fitting.
- Over-tightening a threaded body instead of following the torque chart.
- Routing the tube under tension, past its bending radius, or against the release ring.
Shop DOT Push-to-Connect Fittings →
📚 Related Reading
→ Why DOT Fittings Leak (and How to Fix It)
Educational information only. This article is provided by PneumaticPlus for general educational and informational purposes only. It is not legal, engineering, regulatory, or compliance advice, and it creates no advisory relationship. Standards and regulations — including FMVSS, SAE, and FMCSA/CVSA rules — are periodically revised, may be superseded, and vary by jurisdiction and application. Follow the manufacturer's installation instructions and torque specifications for your specific fittings, and confirm all specifications and application requirements with a qualified professional before installation or return to service. PneumaticPlus makes no representation or warranty as to the accuracy, completeness, or currency of this information and disclaims all liability for reliance on it.