How to Choose the Right DOT Push-to-Connect Fitting

Table of Contents
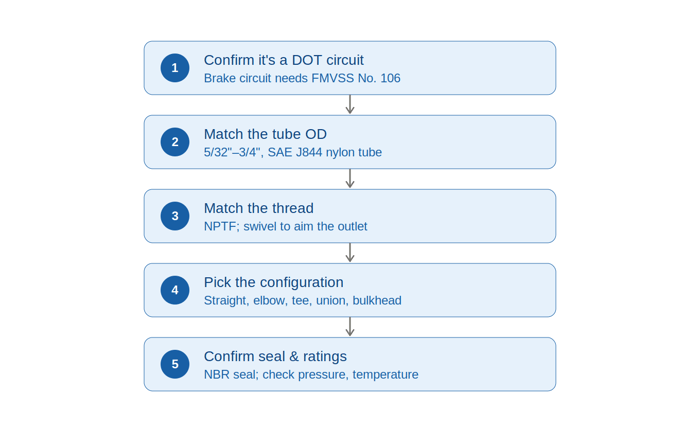
Choosing the right DOT push-to-connect fitting comes down to five checks: confirm it's actually a DOT air-brake circuit, then match the tube outer diameter, the thread type and size, the configuration, and the seal. Get those right and the fitting seats leak-free, fits the port, and keeps the connection compliant. This guide walks each step using the PneumaticPlus PT series.
First, Confirm It's a DOT Circuit
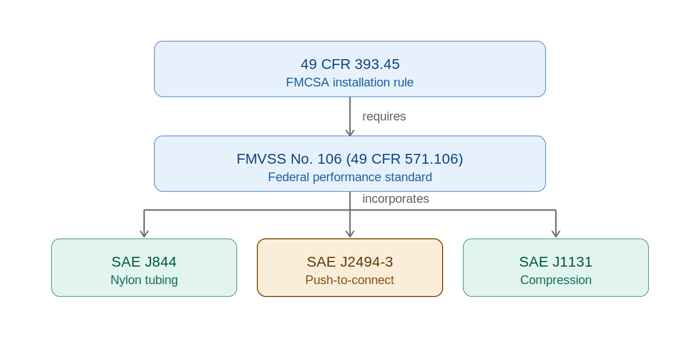
Under 49 CFR 393.45(a), all brake tubing, hoses, brake hose assemblies, and end fittings must meet the requirements of FMVSS No. 106. So the first question is simply whether the connection is part of a commercial-vehicle air-brake circuit. If it is, use a DOT-compliant fitting.
If it isn't — general shop air, machine plumbing, or a non-brake accessory — you don't need to pay for DOT certification. Our regular composite push-to-connect fittings and metal push-to-connect fittings are built for those applications. The rest of this guide assumes a DOT air-brake connection.
1. Match the Tube OD and Material
A push-to-connect fitting accepts exactly one tube outer diameter — there's no tolerance to force a 3/8" tube into a 1/2" port. The PT line covers 5/32", 1/4", 3/8", 1/2", 5/8", and 3/4" OD, and is designed for PA (nylon) tubing complying with SAE (DOT) — SAE J844 tubing. Start by identifying the tube OD your system uses, and confirm the tubing itself is the correct DOT-rated nylon.
2. Match the Thread Type and Size
Read the valve or port datasheet, because the fitting has to match the port it threads into. PT threaded fittings use NPTF (Dryseal) threads. Bulkhead unions use a metric panel thread for the panel side, and unions and the press-in cartridge are threadless (tube-to-tube or cavity-mounted).
Where you need to aim the tube outlet in a specific direction after tightening, a swivel body lets you thread the fitting home and then rotate the outlet to clock the line — useful in tight routing. A fixed body must be oriented by how far it's tightened.
3. Match the Configuration
Plan the line route first, then count the nodes — where you go tube-to-thread, tube-to-tube, branch, or through a panel. The PT series maps directly to those needs:
| What you need | PT-Series configuration |
|---|---|
| Tube to male thread | PT11 straight male; PT14 fixed male elbow; PT15 swivel male elbow; PT15-45 45° swivel male elbow |
| Tube to female thread | PT13 female straight; PT17 swivel female elbow |
| Tube to tube (inline / turn) | PT26 union; PT28 union elbow |
| Branch / distribution | PT29 union tee; PT20 & PT20-F swivel tees; PT23 lateral run tee |
| Panel / frame pass-through | PT27 & PT27-F bulkhead union |
| Threadless valve-body cavity | PT10 press-in cartridge (SAE J2494-4 aluminum cavity) |
4. Confirm the Seal and Operating Conditions
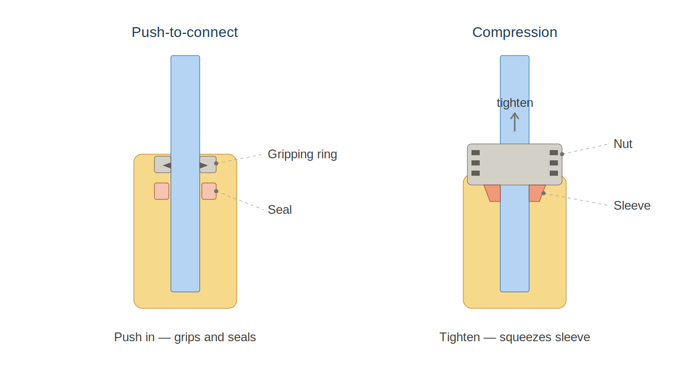
The PT line uses an NBR (low-temperature) seal as standard, a brass body, and a stainless-steel AISI 301 gripping ring, with an incorporated internal tube support for the nylon tube. Confirm the application sits within the line's ratings:
| Parameter | PT Line |
|---|---|
| Working pressure | Vacuum to 290 PSI — verify for the selected fitting and application |
| Temperature range | −55 °F to +212 °F |
| Body / seal | Brass / NBR (low temperature) |
| Recommended tubing | PA (nylon) complying with SAE (DOT) |
Where Not to Use Them
One placement rule matters: per the manufacturer, the PT line is designed for all pneumatic circuits except between the frame and axle, or between a towed and towing vehicle. Those high-movement joints use flexing hose assemblies instead. Push-to-connect fittings serve the tubing runs, not the flexing connections.
Putting It Together
In order: confirm it's a DOT circuit → identify tube OD and confirm SAE J844 nylon tubing → read the port and match the NPTF thread size (swivel if you need to clock it) → pick the configuration from the route → confirm pressure, temperature, and seal. Work that sequence and you land on the correct PT part the first time.
Browse the PT Series DOT Fittings →
📚 Related Reading
→ DOT Metal Push-to-Connect Fittings: The Complete Guide
Educational information only. This article is provided by PneumaticPlus for general educational and informational purposes only. It is not legal, engineering, regulatory, or compliance advice, and it creates no advisory relationship. Standards and regulations — including FMVSS, SAE, and FMCSA/CVSA rules — are periodically revised, may be superseded, and vary by jurisdiction and application. Nothing here should be relied on to determine compliance. All specifications, standards, part numbers, and regulatory references must be independently verified against the current official primary sources (the eCFR, SAE International, NHTSA, and CVSA) and the manufacturer's datasheet, and confirmed with a qualified professional before any purchasing, installation, maintenance, or compliance decision. PneumaticPlus makes no representation or warranty as to the accuracy, completeness, or currency of this information and disclaims all liability for reliance on it.